Creating a New Learning Environment
This tutorial walks through the process of creating a learning environment in Unreal Engine from scratch. By the end, you’ll have an environment where an agent controls a sphere to reach a target while avoiding falling off a platform.
Prerequisites
Before starting, ensure you have:
Unreal Engine version 5.2 or higher installed.
The UnrealMLAgents plugin set up and enabled. Follow the Installation guide if you haven’t done this yet.
Important
There are two install the plugin, either from the FAB Marketplace or by cloning the repository. If you choose the second option, you will need to build the plugin from source.
Overview
Using UnrealMLAgents in your project involves these steps:
Create the Environment: Design the level, including the floor, target, and agent actor. An environment can range from a simple physical simulation containing a few objects to an entire game or ecosystem.
Implement the Agent: Define the agent’s behavior, including observations, actions, and rewards. The agent interacts with the environment and learns based on rewards provided for specific actions.
Group and Organize: Use an Actor or Blueprint to group the environment elements into a cohesive unit. In Unreal, we attach an Agent component to the Actor or Character we want to use as the learning agent. To learn more about Unreal Engine, refer to the Unreal Engine Documentation.
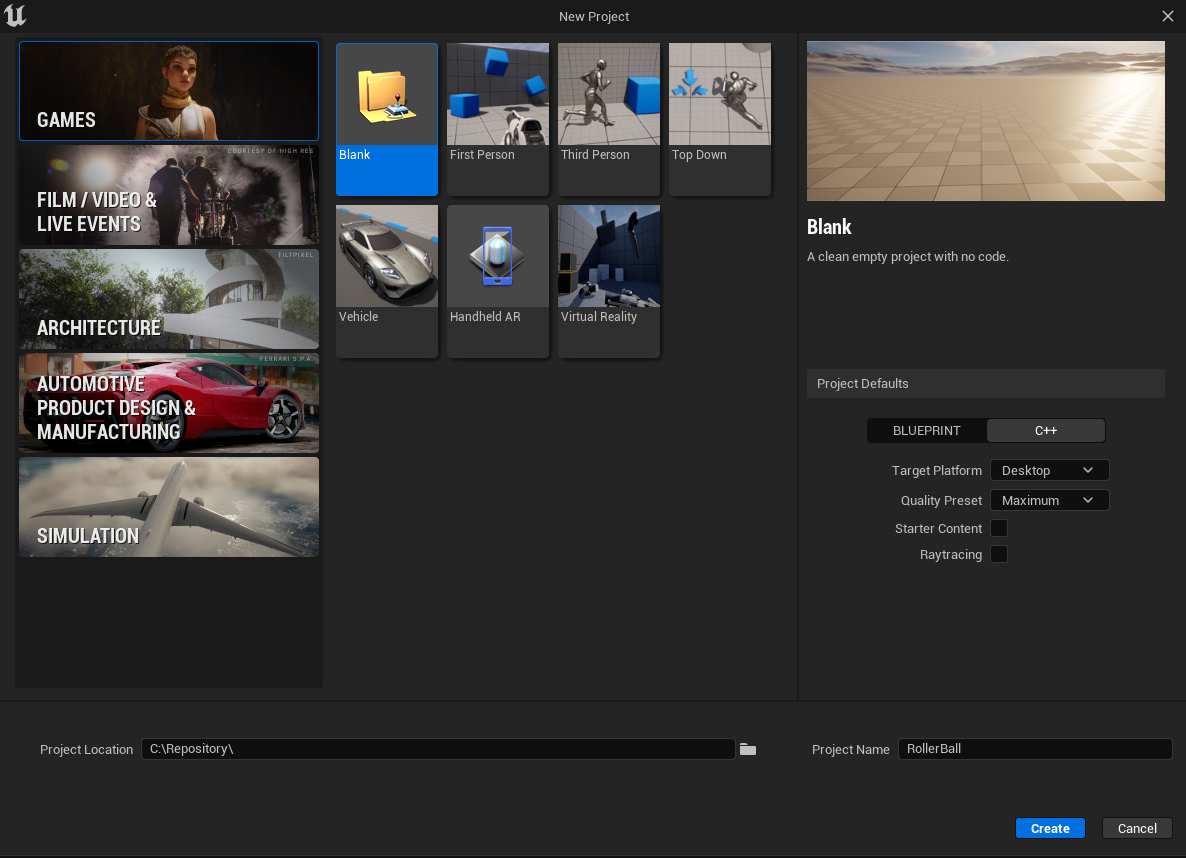
Set Up the Unreal Project
Launch Unreal Engine and create a new Blank C++ project. Note: While this is a C++ project, you can still create Blueprints and use them alongside C++ classes. This tutorial will contain both blueprints-only and C++ versions.
Name the project “RollerSphere” or any name of your choice.
Enable the UnrealMLAgents plugin in Edit -> Plugins.
Your Unreal project should contain the plugin enabled like this:

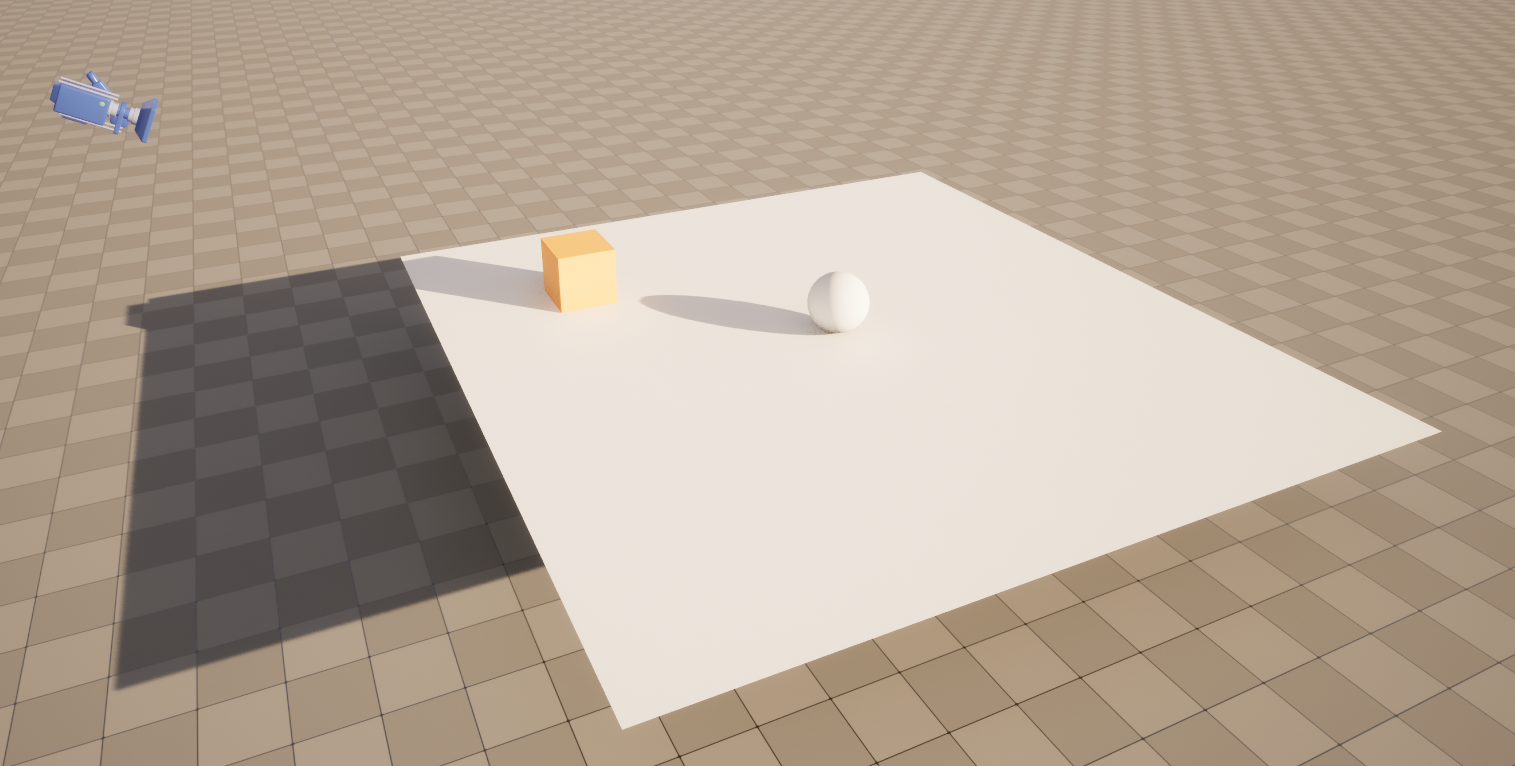
Create the Environment
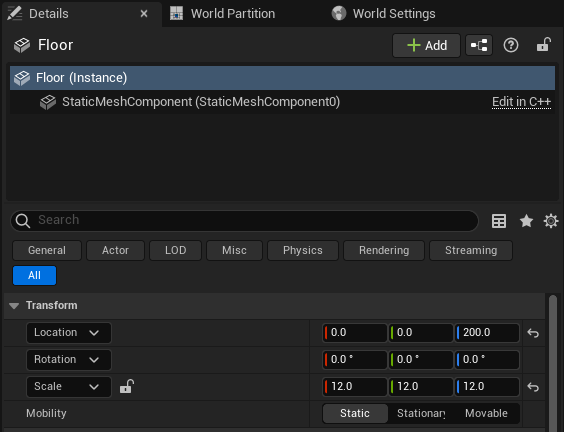
Create the Floor
Click on the Cube above the viewport, Shapes -> Plane.
Name the Actor “Floor”.
Set the Transform values:
Location: (0, 0, 200)
Rotation: (0, 0, 0)
Scale: (12, 12, 12)
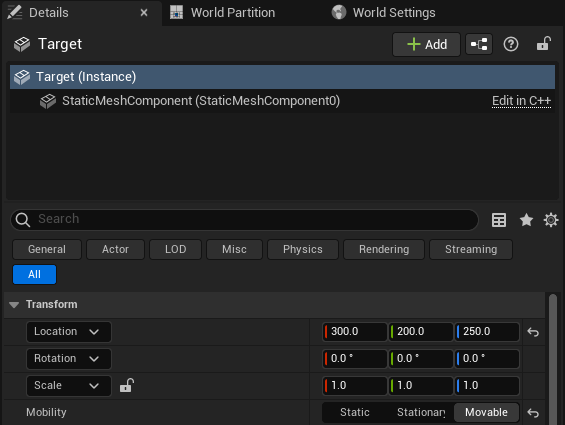
Add the Target Cube
Click on the Cube above the viewport, Shapes -> Cube.
Name the Actor “Target”.
Set the Transform values:
Location: (300, 200, 250)
Rotation: (0, 0, 0)
Scale: (1, 1, 1)
Set the mobility to Movable under Transform.
Add the Agent Sphere
Instead of adding a basic sphere actor, create a Blueprint class for the agent.
Right-click in the Content Browser and select Blueprint Class -> Pawn.
Name the Blueprint “BP_RollerBall”.
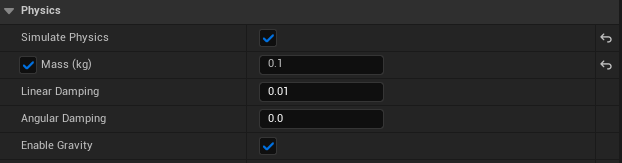
Open the Blueprint Editor for BP_RollerBall and add the following components: - Sphere Component: Represents the agent visually. Set its physics properties:
Enable physics and set the mass to 0.1 kg.
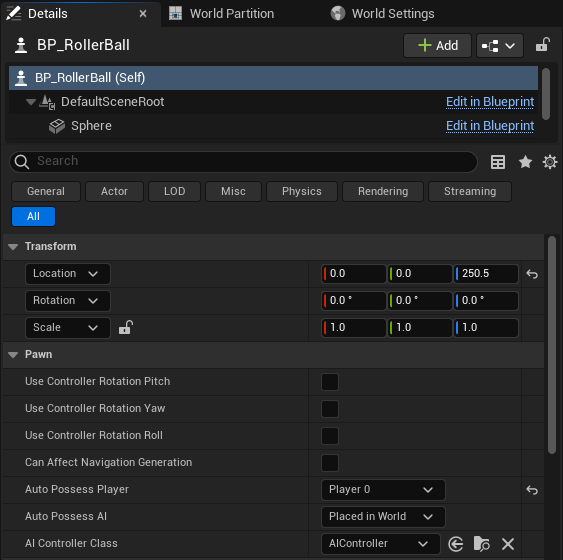
Place the BP_RollerBall Blueprint in the level at (0, 0, 250.5).
Set the Auto Possess Player to Player 0 in the Details panel.
Note
While we could have created the BP_RollerBall in C++, we chose to create it in Blueprint for simplicity. You will see that in Unreal, it’s not just Blueprint or C++, but a mix of both that makes development efficient.
Add the camera
Click on the Cube above the viewport, All classes -> Camera Actor.
Name the Actor “CameraActor”.
Set the Transform values:
Location: (900.00, 0, 650)
Rotation: (0, -30, -180)
Scale: (1, 1, 1)
By default Unreal Engine will set an initial camera at start. We need to replace this camera by the one we just created. For that we need to set the view target at the level blueprint.
Open the level blueprint this way:

Set the view target to the camera we just created:

Note
To create a reference to the Camera Actor. Select in the level the camera, go in the level blueprint, right-click, and select “Add reference to CameraActor”.
Group into Training Area
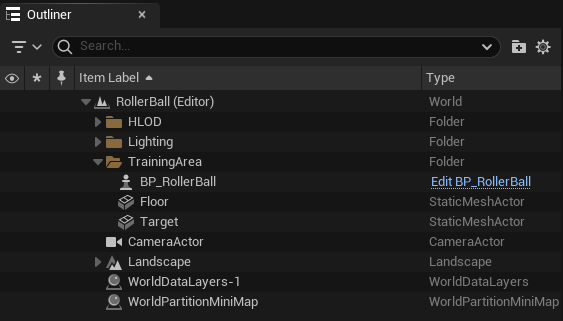
Group objects by highlighting them in the World Outliner and adding them to a new folder.
In the outliner, Right-click and select Create Folder. Name the folder “TrainingArea”.
Highlight the Floor, Target, and BP_RollerBall in the Outliner and drag/drop to the “TrainingArea” folder.
Implementing the Agent
Create the Agent Component
In this section, we will create the Agent Component and attach it to our BP_RollerBall. This component will handle all the agent’s interactions with the environment. By design, the Agent is implemented as a Component to allow attachment to both Pawns and Characters, enabling flexibility.
Right-click in the Content Browser and select Blueprint Class.
In the search bar, type “Agent” and select it.
Name the new Blueprint Component “BPC_RollerAgent”.
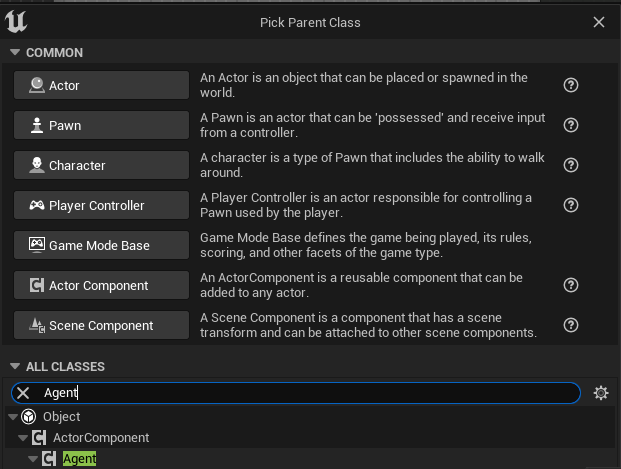
In Tools (top menu), select New c++ class.
Select All Classes and search for Agent. It will be under ActorComponent.
Click Next, and name the new C++ class “RollerAgent”.

This will create a new C++ class named RollerAgent. If you want this class to be available in the editor, you will need to add the UCLASS() macro to the class definition.
UCLASS(Blueprintable, ClassGroup = (Custom), meta = (BlueprintSpawnableComponent))
class ROLLERBALL_API URollerAgent : public UAgent
Add the Agent Component to BP_RollerBall:
Open the BP_RollerBall Blueprint.
In the Components section, click Add and search for “BPC_RollerAgent (Blueprint)” or “RollerAgent (C++)”.
Add this component to the BP_RollerBall Blueprint.
So far, we have set up the environment and the agent component. Next, we will implement the logic that allows the agent to learn and interact with the environment. Specifically, we will extend three key methods:
OnEpisodeBegin: Resets the environment and initializes variables for a new episode.
CollectObservations: Collects data about the environment for the agent to process.
OnActionReceived: Applies actions taken by the agent and assigns rewards.
These methods form the foundation of reinforcement learning for the agent.
Initialization and Resetting the Agent
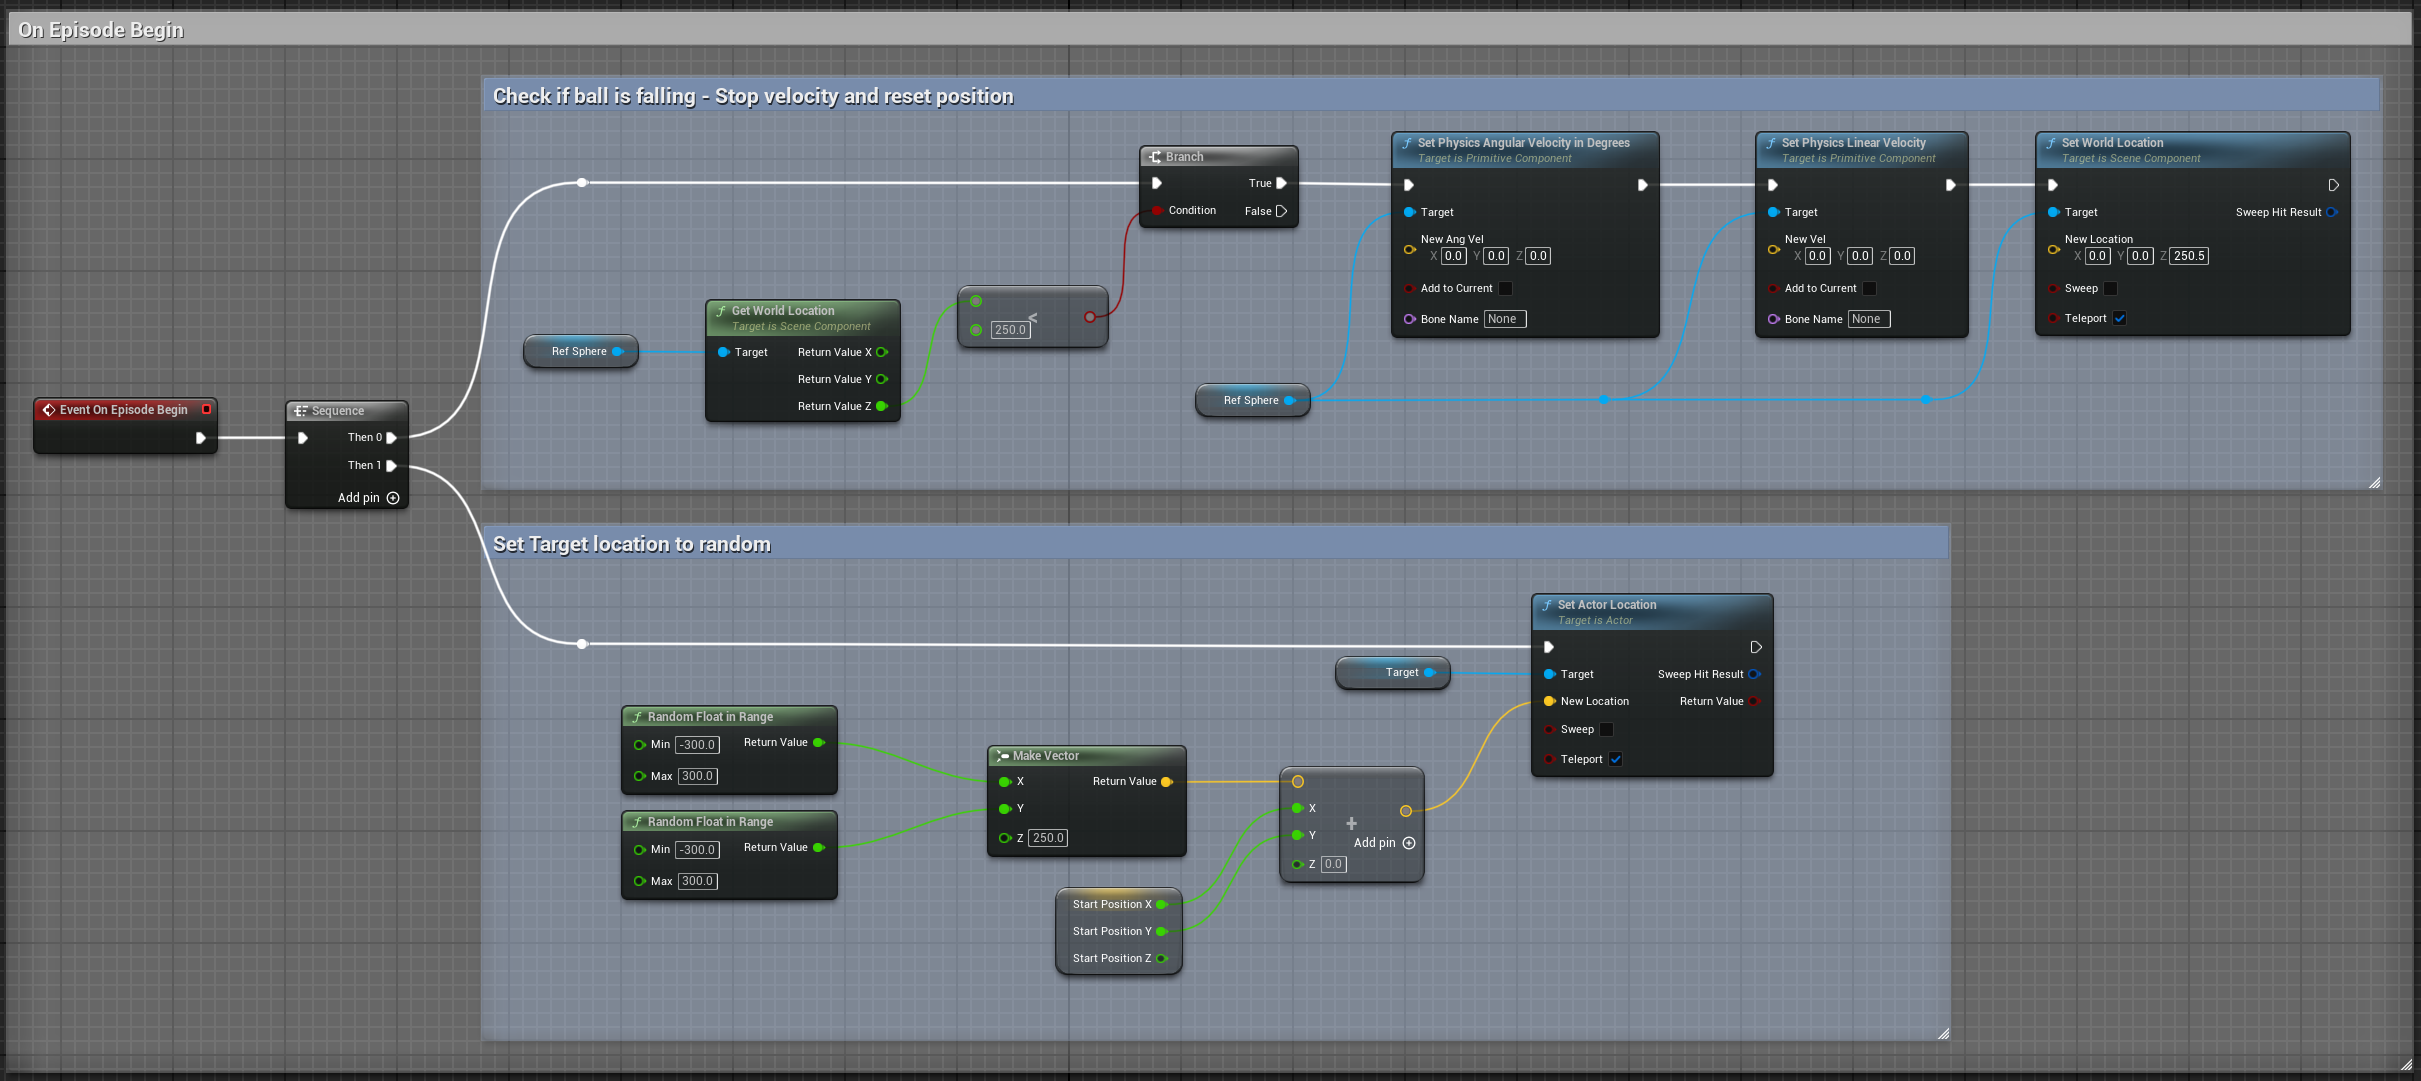
The process of training in the UnrealMLAgents Toolkit involves running episodes where the Agent (Sphere) attempts to solve the task. Each episode lasts until the Agent solves the task (i.e., reaches the target cube), fails (falls off the platform), or times out (takes too long to solve or fail the task). At the start of each episode, OnEpisodeBegin is called to set up the environment for a new episode. Typically, the scene is initialized in a random manner to enable the agent to learn to solve the task under a variety of conditions.
In this example, each time the Agent (Sphere) reaches its target (Cube), the episode ends, and the target (Cube) is moved to a new random location. If the Agent rolls off the platform, it will be put back onto the floor. These tasks are all handled in OnEpisodeBegin.
To move the target (Cube), we need a reference to its Transform, which stores an Actor’s position, orientation, and scale in the 3D world. In Unreal, you can achieve this by adding a public property for the Target’s Transform in the Agent Component or Blueprint. This allows you to manipulate the target’s location dynamically during each episode.
To reset the Agent’s velocity (and later to apply force to move the Agent), you need a method to reset its movement directly. In Unreal, this is achieved by manipulating the velocity of the Sphere Component. Specifically, you can set the velocity vector to zero in the OnEpisodeBegin method. This ensures the agent starts each episode with no residual momentum.
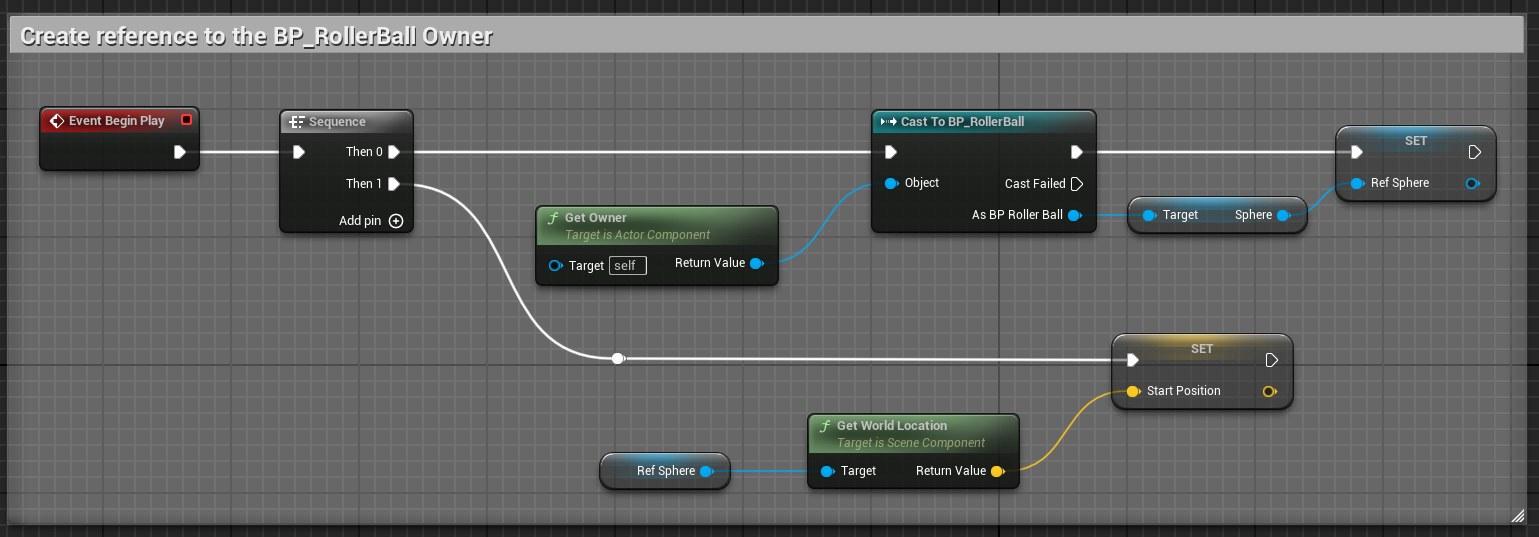
Before we dig into the OnEpisodeBegin method, let’s set up the references to the owner.
In Blueprint, follow these steps to create and configure the necessary variables for the Agent Component:
Create a Reference to BP_RollerBall Sphere: - In the Variables section of the Agent Component, click the + Variable button. - Set the variable type to Static Mesh Component.
Store the Start Position of the Sphere: - Create a new variable of type Vector. - This will be used to calculate the relative position of the target.
Save the Reference of the Target Cube: - Create a new variable called Target of type Actor. - Make it public by clicking the Eye icon next to it.
These variables will be essential for tracking the agent’s state and interactions with the environment. Then you can set these variable on the Event Begin Play:
In C++, we will create a reference to the Sphere and store the necessary data to calculate its interactions with the target. You cannot directly reference a Blueprint class unless it inherits from a C++ class. However, since our Sphere is part of the owning Actor, we can access it through the Static Mesh Component of the agent’s owner. This allows us to track the agent’s movement dynamically.
We also need to store the initial position of the Sphere in an FVector variable, ensuring we can later compute its relative position to the target.
Lastly, we require a public AActor* reference to store the Target Cube, which will be assigned in the level editor. This allows the agent to interact with the environment efficiently during execution.
public:

   virtual void BeginPlay() override;

   // The Cube target reference. UPROERTY() here to pass the reference in  the editor.
   UPROPERTY(EditAnywhere, BlueprintReadWrite, Category = "Agent")
   AActor* Target;

private:

   UPROPERTY()
   UStaticMeshComponent* Sphere = nullptr;

   // Save Initial position of the Sphere
   FVector StartPosition;
void URollerAgent::BeginPlay()
{
   Super::BeginPlay();

   // Get the owning actor
   AActor* OwnerActor = GetOwner();
   UActorComponent* RootComponent = OwnerActor->GetComponentByClass(UStaticMeshComponent::StaticClass());
   Sphere = Cast<UStaticMeshComponent>(RootComponent);
   StartPosition = Sphere->GetComponentLocation();
}
Implementing the OnEpisodeBegin method in the Agent Component:
public:

   // Override OnEpisodeBegin c++ method.
   void OnEpisodeBegin_Implementation() override;
void URollerAgent::OnEpisodeBegin_Implementation() {

   // If the Agent fell, zero its momentum
   if (Sphere->GetComponentLocation().Z < 250) {
      Sphere->SetPhysicsLinearVelocity(FVector::ZeroVector);
      Sphere->SetPhysicsAngularVelocityInDegrees(FVector::ZeroVector);
      Sphere->SetWorldLocation(FVector(0.0f, 0.0f, 250.5f), false, nullptr, ETeleportType::ResetPhysics);
   }

   // Make the spawn of the target to a random spot relative to the sphere start position
   FVector RandomLocation = FVector(FMath::RandRange(-300, 300), FMath::RandRange(-300, 300), 250);
   RandomLocation.X += StartPosition.X;
   RandomLocation.Y += StartPosition.Y;
   Target->SetActorLocation(RandomLocation, false, nullptr, ETeleportType::ResetPhysics);
}
You might wonder why we add the RollerBall’s start position to the Cube’s position. This ensures that the Cube spawns relative to the Sphere’s position, regardless of where it is in the world.
Next, let’s implement the Agent.CollectObservations(VectorSensor sensor) method.
Observing the Environment
The Agent sends the information it collects to the Brain, which uses it to make decisions. When training the Agent (or using a trained model), this data is fed into a neural network as a feature vector. To enable the Agent to successfully learn a task, it is critical to provide accurate and relevant information. A good rule of thumb is to include all data necessary to calculate an analytical solution to the problem.
In this example, the information our Agent collects includes:
The position of the target (the cube).
The position of the agent itself relative to it’s start position.
The velocity of the agent.
The distance of the sphere relative to its start position.
The distance between the sphere and the target.
This additional information helps the Agent learn to control its movement effectively, avoid overshooting the target, and understand its spatial relationship within the environment.
- To facilitate the implementation in Blueprint and to make it clearer, we will need to create two functions:
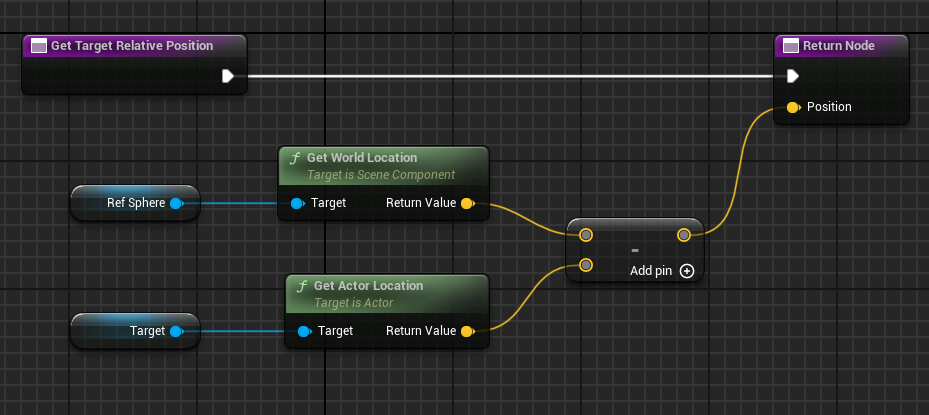
GetTargetRelativePosition: Calculates the relative position between the target and the sphere’s start position.
GetRelativePositionToStart: Calculates the relative position between the sphere and its start position.
GetTargetRelativePosition():
Open the BPC_RollerAgent Blueprint.
Create a new function named “GetTargetRelativePosition”.
Add Return Node with output type Vector named “Position”
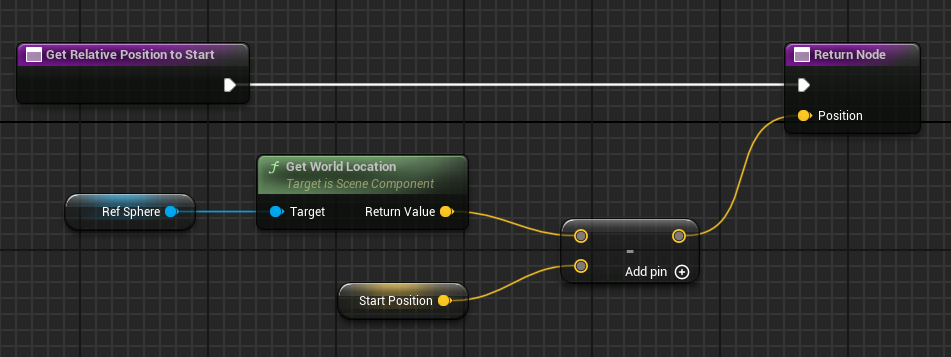
GetRelativePositionToStart():
Open the BPC_RollerAgent Blueprint.
Create a new function named “GetRelativePositionToStart”.
Add Return Node with output type Vector named “Position”
The full implementation of the Agent.CollectObservations(VectorSensor sensor) method in Blueprint:
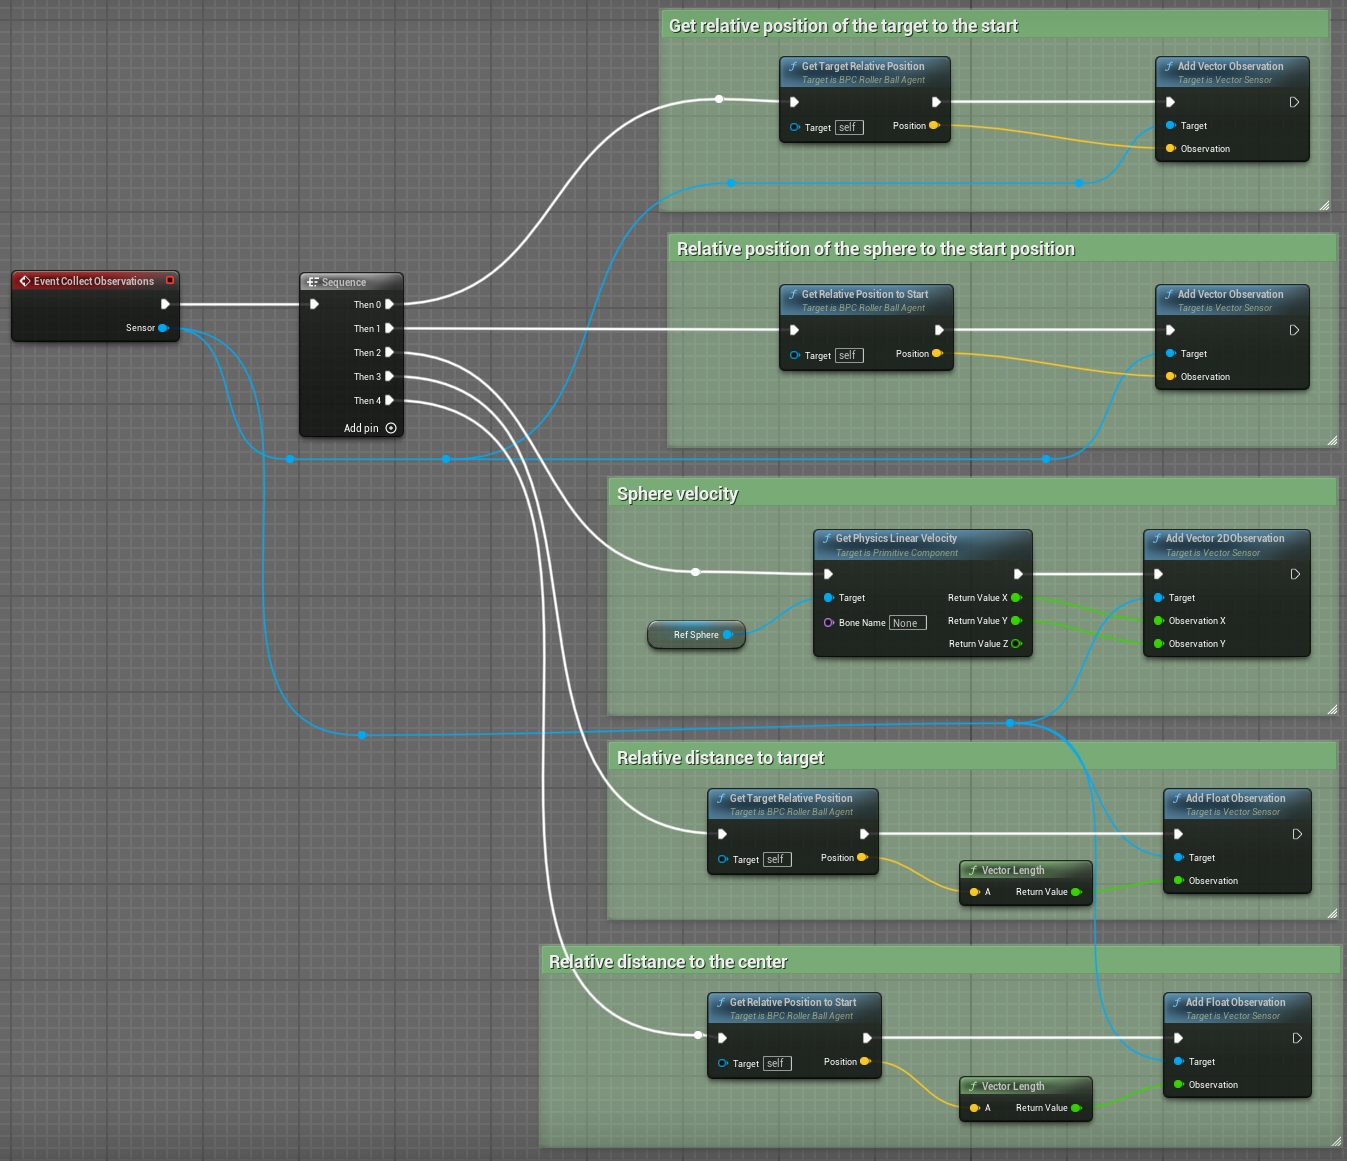
- To facilitate the CollectObservations method, we will in addition to the CollectObservation(), create two methods:
GetTargetRelativePosition: Calculates the relative position between the target and the sphere’s start position.
GetRelativePositionToStart: Calculates the relative position between the sphere and its start position.
public:

   void CollectObservations_Implementation(UVectorSensor* Sensor) override;

private:

   FVector GetTargetRelativePosition();
   FVector GetRelativePositionToStart();
void URollerAgent::CollectObservations_Implementation(UVectorSensor* Sensor) {

   // Position of the target and the Sphere
   Sensor->AddVectorObservation(GetTargetRelativePosition());
   Sensor->AddVectorObservation(GetRelativePositionToStart());

   // Velocity of the sphere
   FVector SphereVelocity = Sphere->GetPhysicsLinearVelocity();
   Sensor->AddVector2DObservation(FVector2D(SphereVelocity.X, SphereVelocity.Y));

   // Distance between the sphere and the target
   Sensor->AddFloatObservation(GetTargetRelativePosition().Length());

   // Distance between the sphere and its start position
   Sensor->AddFloatObservation(GetRelativePositionToStart().Length());
}


FVector URollerAgent::GetTargetRelativePosition() {
   return FVector(
      Sphere->GetComponentLocation() - Target->GetActorLocation()
   );
}

FVector URollerAgent::GetRelativePositionToStart() {
   return FVector(
      Sphere->GetComponentLocation() - StartPosition
   );
}
Taking Actions and Assigning Rewards
The final part of the Agent code is the Agent.OnActionReceived() method, which receives actions and assigns rewards.
Actions
To solve the task of moving towards the target, the Agent (Sphere) needs to use discrete actions to move along the X and Y directions. As such, the agent requires 5 actions: - -X: Move left by applying force along the negative X-axis. - +X: Move right by applying force along the positive X-axis. - -Y: Move down by applying force along the negative Y-axis. - +Y: Move up by applying force along the positive Y-axis. - No movement
Using discrete actions reduces the complexity of the neural network since it only needs to evaluate a limited set of predefined actions for a given observation. This approach simplifies the decision-making process for the agent while still allowing effective control of its movement.
In Unreal, we can apply forces to the Sphere Component to enable movement. Each discrete action corresponds to a specific force application:
Action 0: No movement.
Action 1: Apply force of 1 along the negative X-axis.
Action 2: Apply force of 1 along the positive X-axis.
Action 3: Apply force of 1 along the negative Y-axis.
Action 4: Apply force of 1 along the positive Y-axis.
Mapping these discrete actions to movement logic reduces complexity and ensures clear action-to-effect relationships. This logic is implemented in OnActionReceived(), where the action index is mapped to the respective force vector applied to the Sphere Component.
Rewards
Reinforcement learning requires rewards to signal which decisions are good and which are bad. The learning algorithm uses the rewards to determine whether it is giving the Agent the optimal actions. You want to reward an Agent for completing the assigned task. In this case, the Agent is given a reward of 1.0 for reaching the target cube.
Additionally, if the Agent falls off the platform, it is given a small malus of -0.1. This penalty helps the Agent understand that falling off the platform is undesirable and should be avoided.
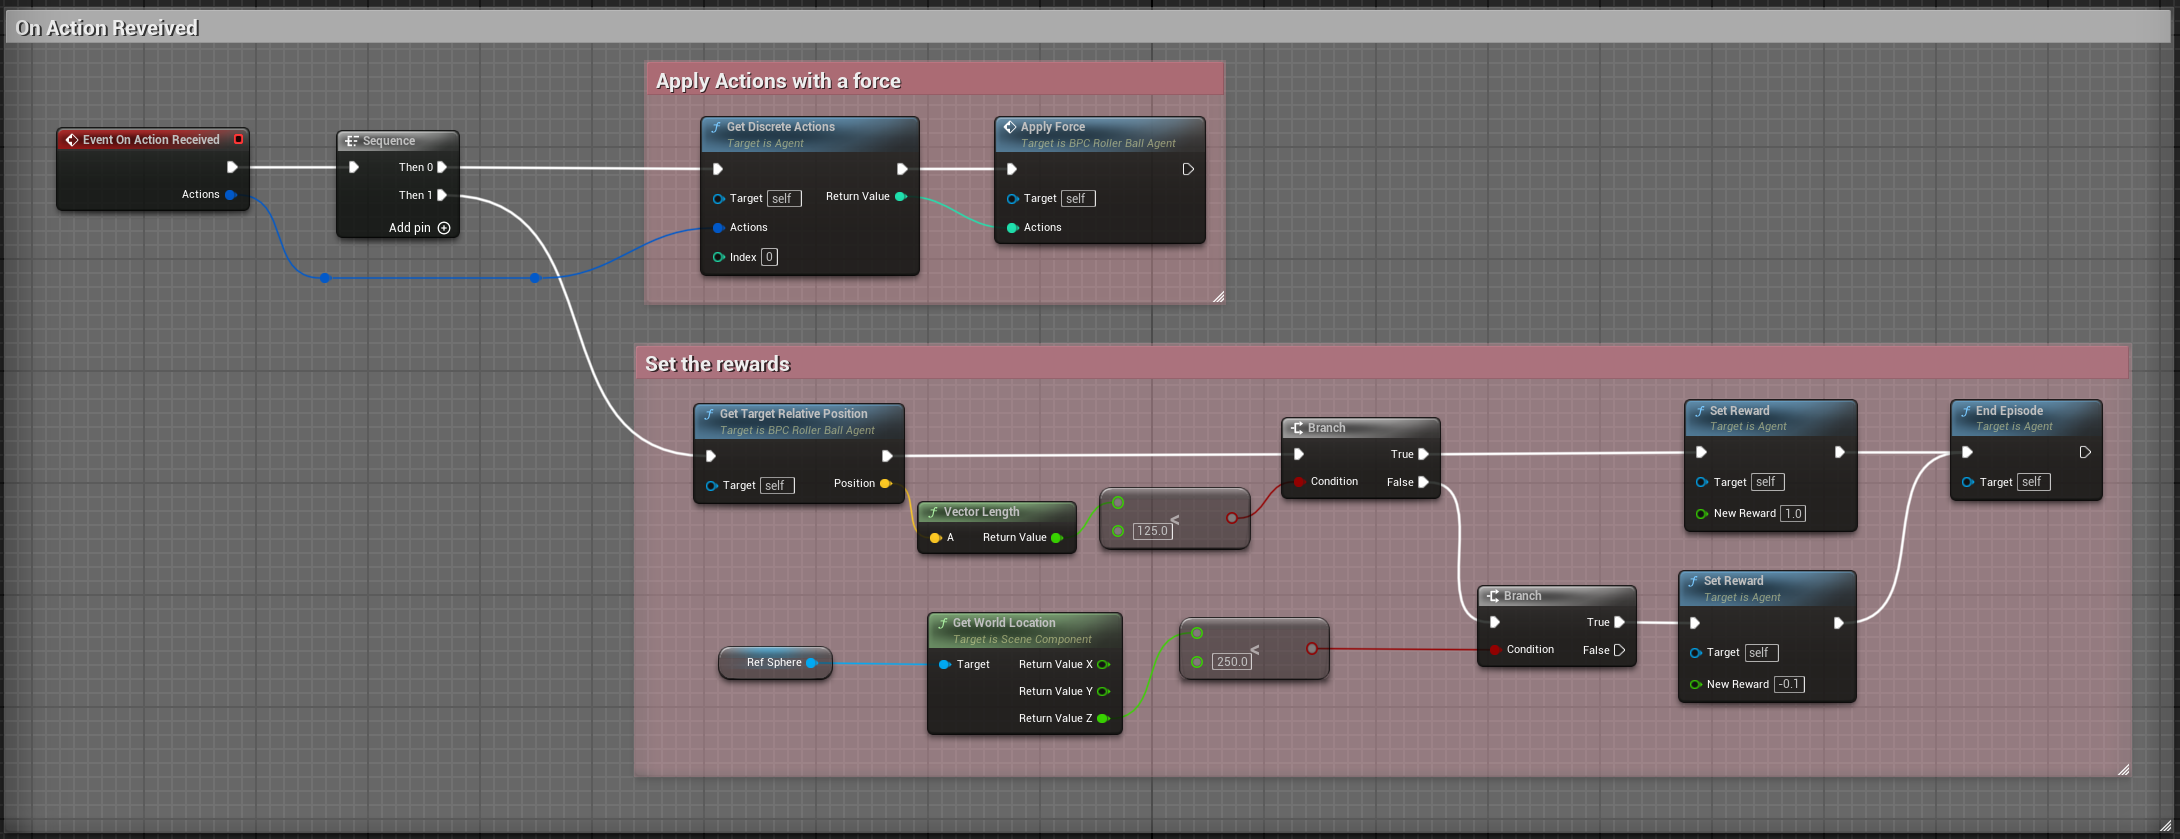
Rewards are assigned in OnActionReceived(). The Agent calculates the distance to detect when it reaches the target. When it does, the code calls Agent.SetReward() to assign a reward of 1.0 and marks the agent as finished by calling EndEpisode(). If the Agent falls off the platform, the malus is applied, and EndEpisode() is also triggered to restart the episode.
OnActionReceived()
For a matter of simplification we have add a function to apply the force to the sphere. This method is called ApplyForce and takes an integer as input to determine the direction of the force.
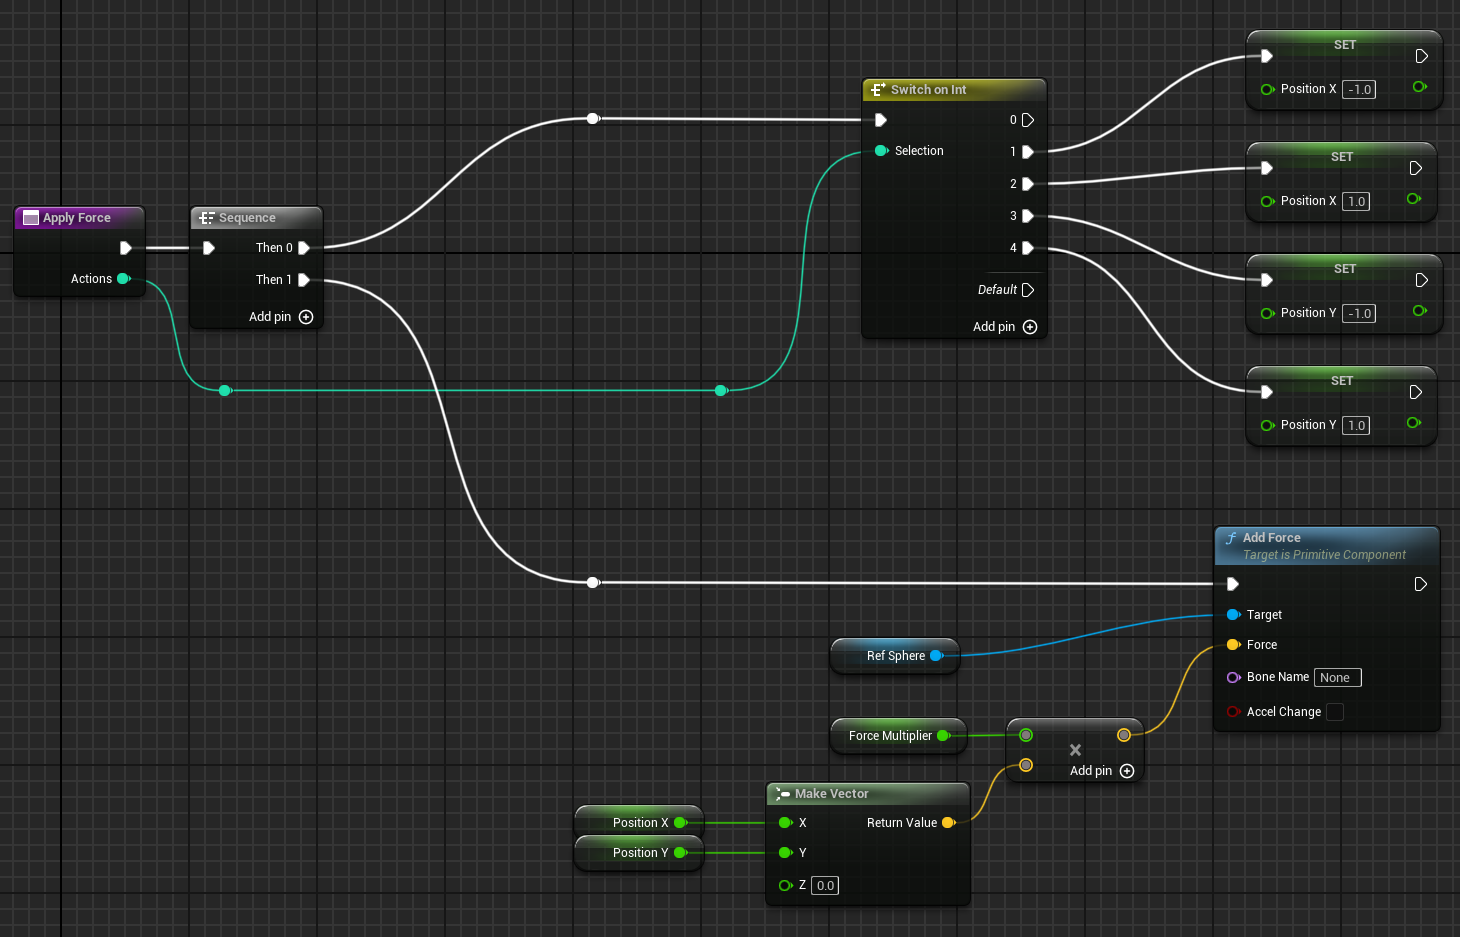
As you can see this method use a ForceMultiplier variable to determine the force to apply to the sphere. ForceMultiplier must be set as Public in the Blueprint to be able to set it from the Inspector window. To do that, on the right side of the variable, click on the eye icon to make it public. We can also set a default value to that variable. Click on the variable and on the detail panel on the right, set the default value to 100.
PositionX and PositionY are two variables that store the position of the sphere in the X and Y axis. These variables are local to the method and will be reset each time we call the method. To add local variables, click on the “+” next to LOCAL VARIABLES and set the variable type to Float.
Now here is the full implementation of the OnActionReceived() method in Blueprint:
In addition to the ApplyForce method, we will also need to add a ForceMultiplier variable to determine the force to apply to the sphere. The user is free to set this value from the Inspector window.
public:

   void OnActionReceived_Implementation (const FActionBuffers& Actions) override;

   UPROPERTY(EditAnywhere, BlueprintReadWrite, Category = "Agent | Movement")
   float ForceMultiplier = 50.0f;
void URollerAgent::OnActionReceived_Implementation(const FActionBuffers& Actions) {
   float DirectionX = 0;
   float DirectionY = 0;

   int32 Movement = Actions.DiscreteActions[0];
   if (Movement == 1) { DirectionX = -1; }
   if (Movement == 2) { DirectionX = 1; }
   if (Movement == 3) { DirectionY = -1; }
   if (Movement == 4) { DirectionY = 1; }

   Sphere->AddForce(FVector(DirectionX, DirectionY, 0) * ForceMultiplier);

   if (GetTargetRelativePosition().Length() < 125) {
      SetReward(1);
      EndEpisode();
   }

   if (Sphere->GetComponentLocation().Z < 250) {
      SetReward(-0.1);
      EndEpisode();
   }
}
Note
Since ForceMultiplier is public, you can set the value from the Inspector window. Select the sphere in the level, and in the Details panel, you will see the Force Multiplier variable.
Final Agent Setup in Editor
Now that all the environment components and Agent setup are in place, it is time to configure the BP_RollerBall Blueprint to finalize the setup. This involves adding and configuring the necessary components for decision-making and behavior.
Open the BP_RollerBall Blueprint.
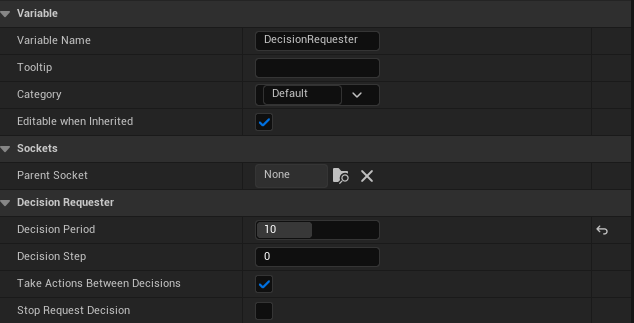
Add the DecisionRequester Component:
Set the Decision Period to 10 to define how often decisions are requested from the agent.
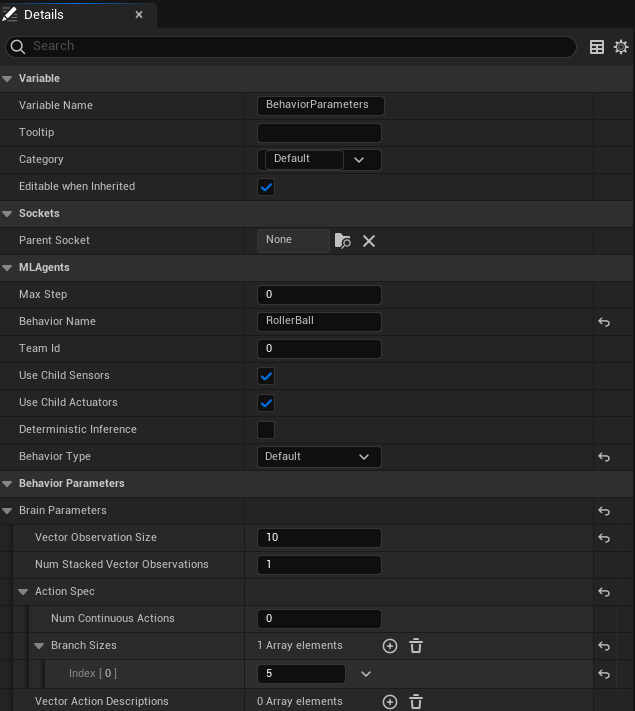
Add the BehaviorParameters Component:
Set the Behavior Name to “RollerBall”
In Brain Parameters:
Set Vector Observation Space Size to 10. This includes all the observations collected by the agent.
Set Behavior Type to Default. This will allow UnrealMLAgents to select automatically heuristic mode if no server are available.
Set Discrete Actions (Action Spec -> Branch Sizes) with 1 branch and 5 actions corresponding to the agent’s possible movements (0 for no movement, 1-4 for movement in specific directions).
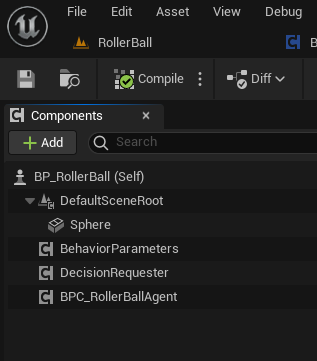
With these components added, your agent is fully configured and ready for testing and training. Here is what is should look like for every components:
BehaviorParameters Component:
DecisionRequester Component:
Finally what the BP_RollerBall Components section should look like:
Testing the Environment
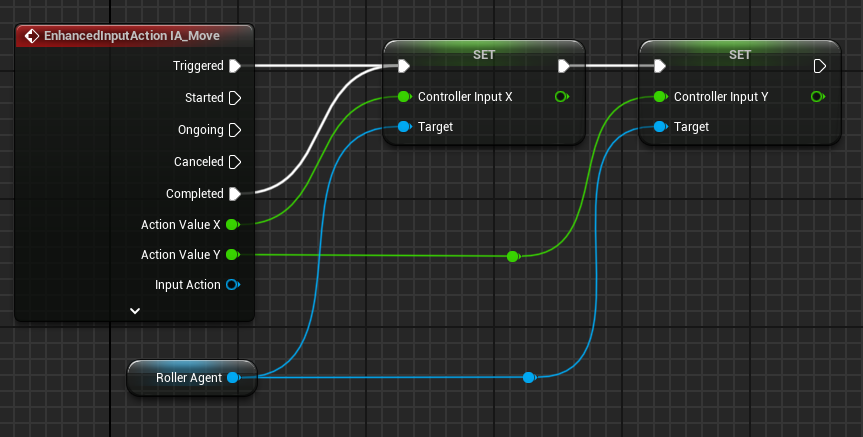
It is always a good idea to first test your environment by controlling the Agent using the keyboard. To do so, you will need to extend the Heuristic() method in the RollerAgent class. For this example, the heuristic will generate an action corresponding to the values of the “Horizontal” and “Vertical” input axis (which correspond to the keyboard arrow keys).
In unreal things are not as straightforward as in Unity in order to get input from a controller, but we can still achieve the same result.
Input Mapping
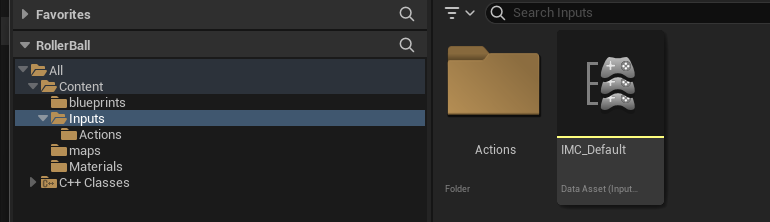
In the content drawer, under Content, create a new folder called Inputs. In that folder, create an Input Mapping Context named IMC_Default:
Right-click in the content drawer.
Under Input, select Input Mapping Context and name it IMC_Default.
Next, create an Action Mapping to keep things organized. Create a folder called Actions. In that folder:
Right-click in the content drawer.
Under Input, select Input Action and name it IA_Move.
At this stage, your content drawer should look like this:
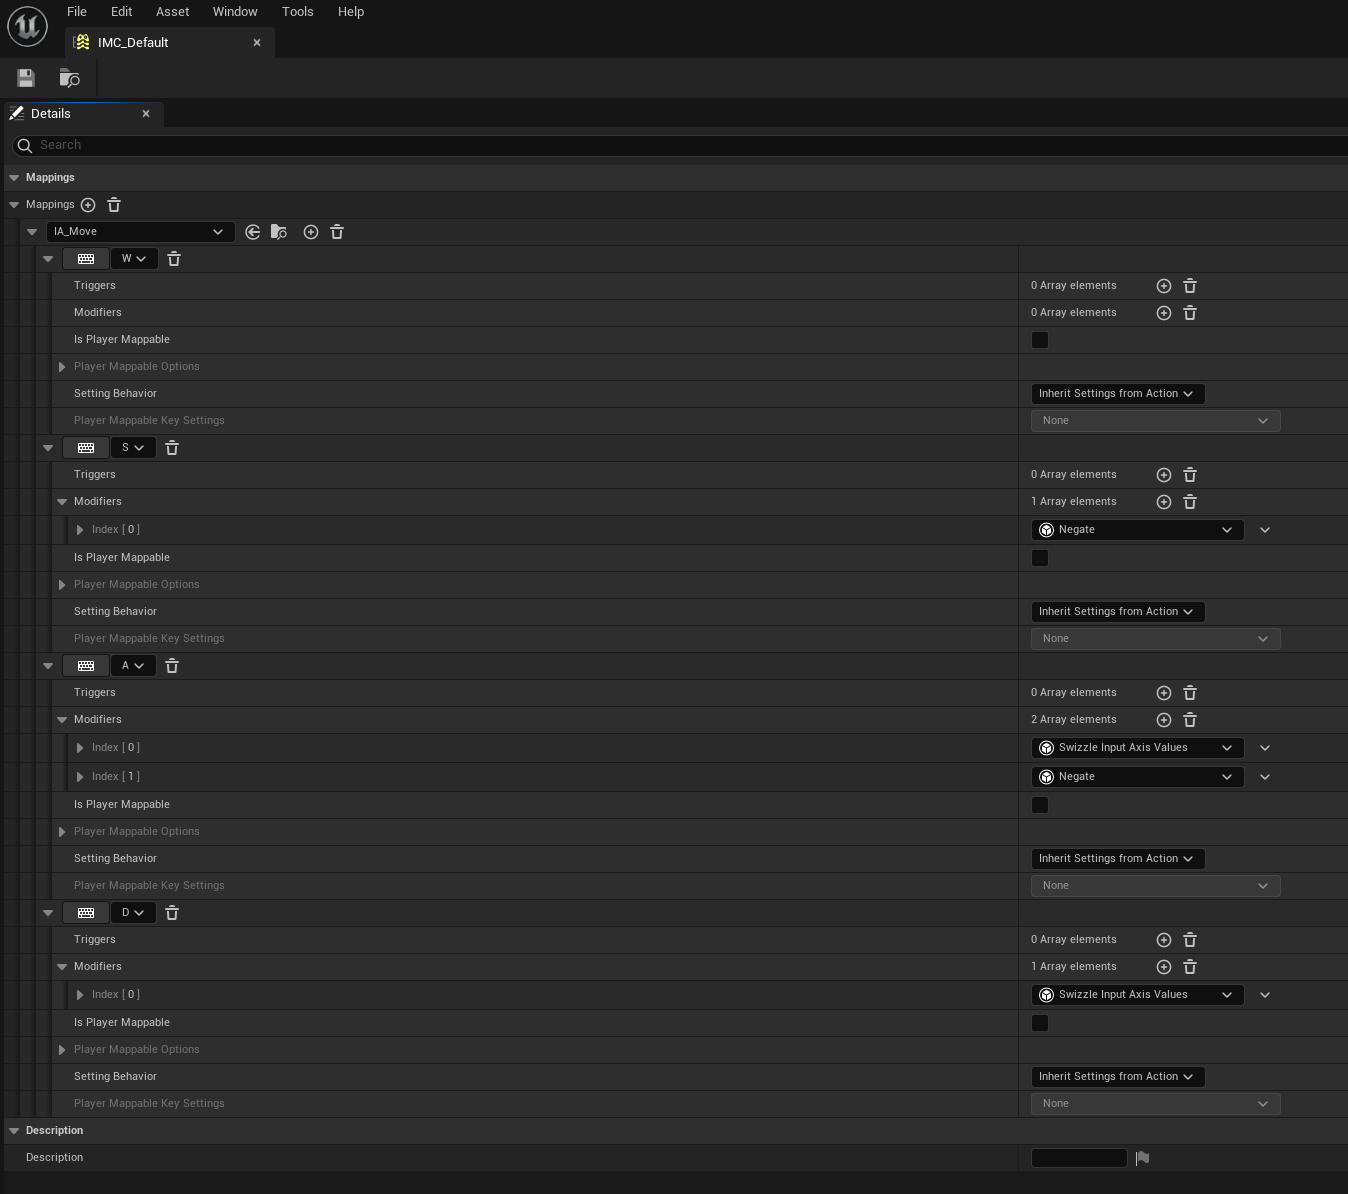
Now, set values in the Input Action. Open IA_Move and configure the following settings:

Note
Axis2D (Vector2D) will provide the value of the axis as a 2D vector, including both X and Y axes.
Then open the IMC_Default and set the following values:
Note
If you want to learn more about enhanced input, you should check the Unreal documentation: Enhanced Input.
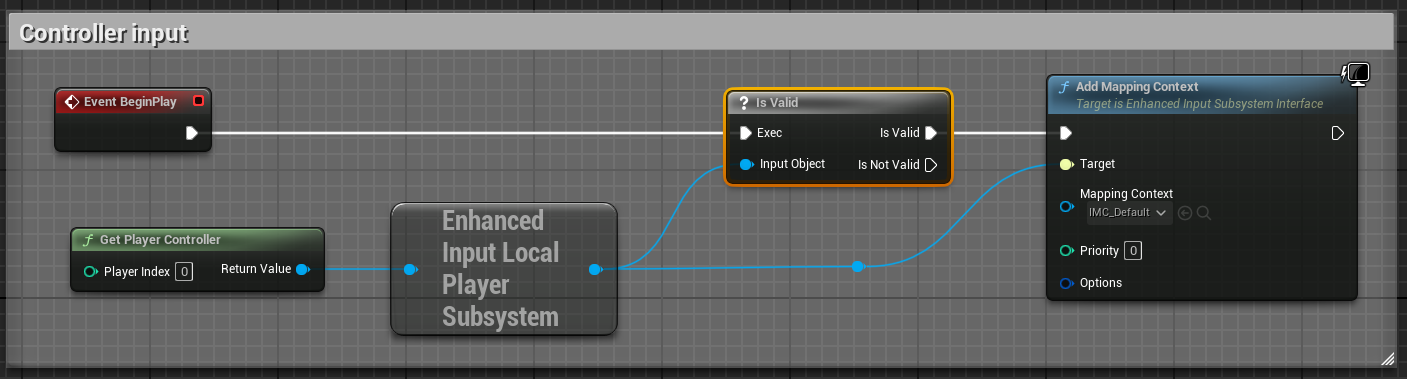
Before we jump into the heuristic() method, we need to set our Mapping Context. To do that, open the BP_RollerBall Blueprint and add the following nodes:
Note
For C++ user, you only need to implement what is in the Controller Input section. While this could also have been done in C++, in some cases, it is quicker to do it in Blueprint.
Heuristic Method
The heuristic method is a simple way to control the Agent using the keyboard. It is used for testing the environment. Here are the steps to implement the heuristic method both in Blueprint and C++:
Note
While everything can be done in Blueprint, in some case you will see that the C++ implementation is more efficient.
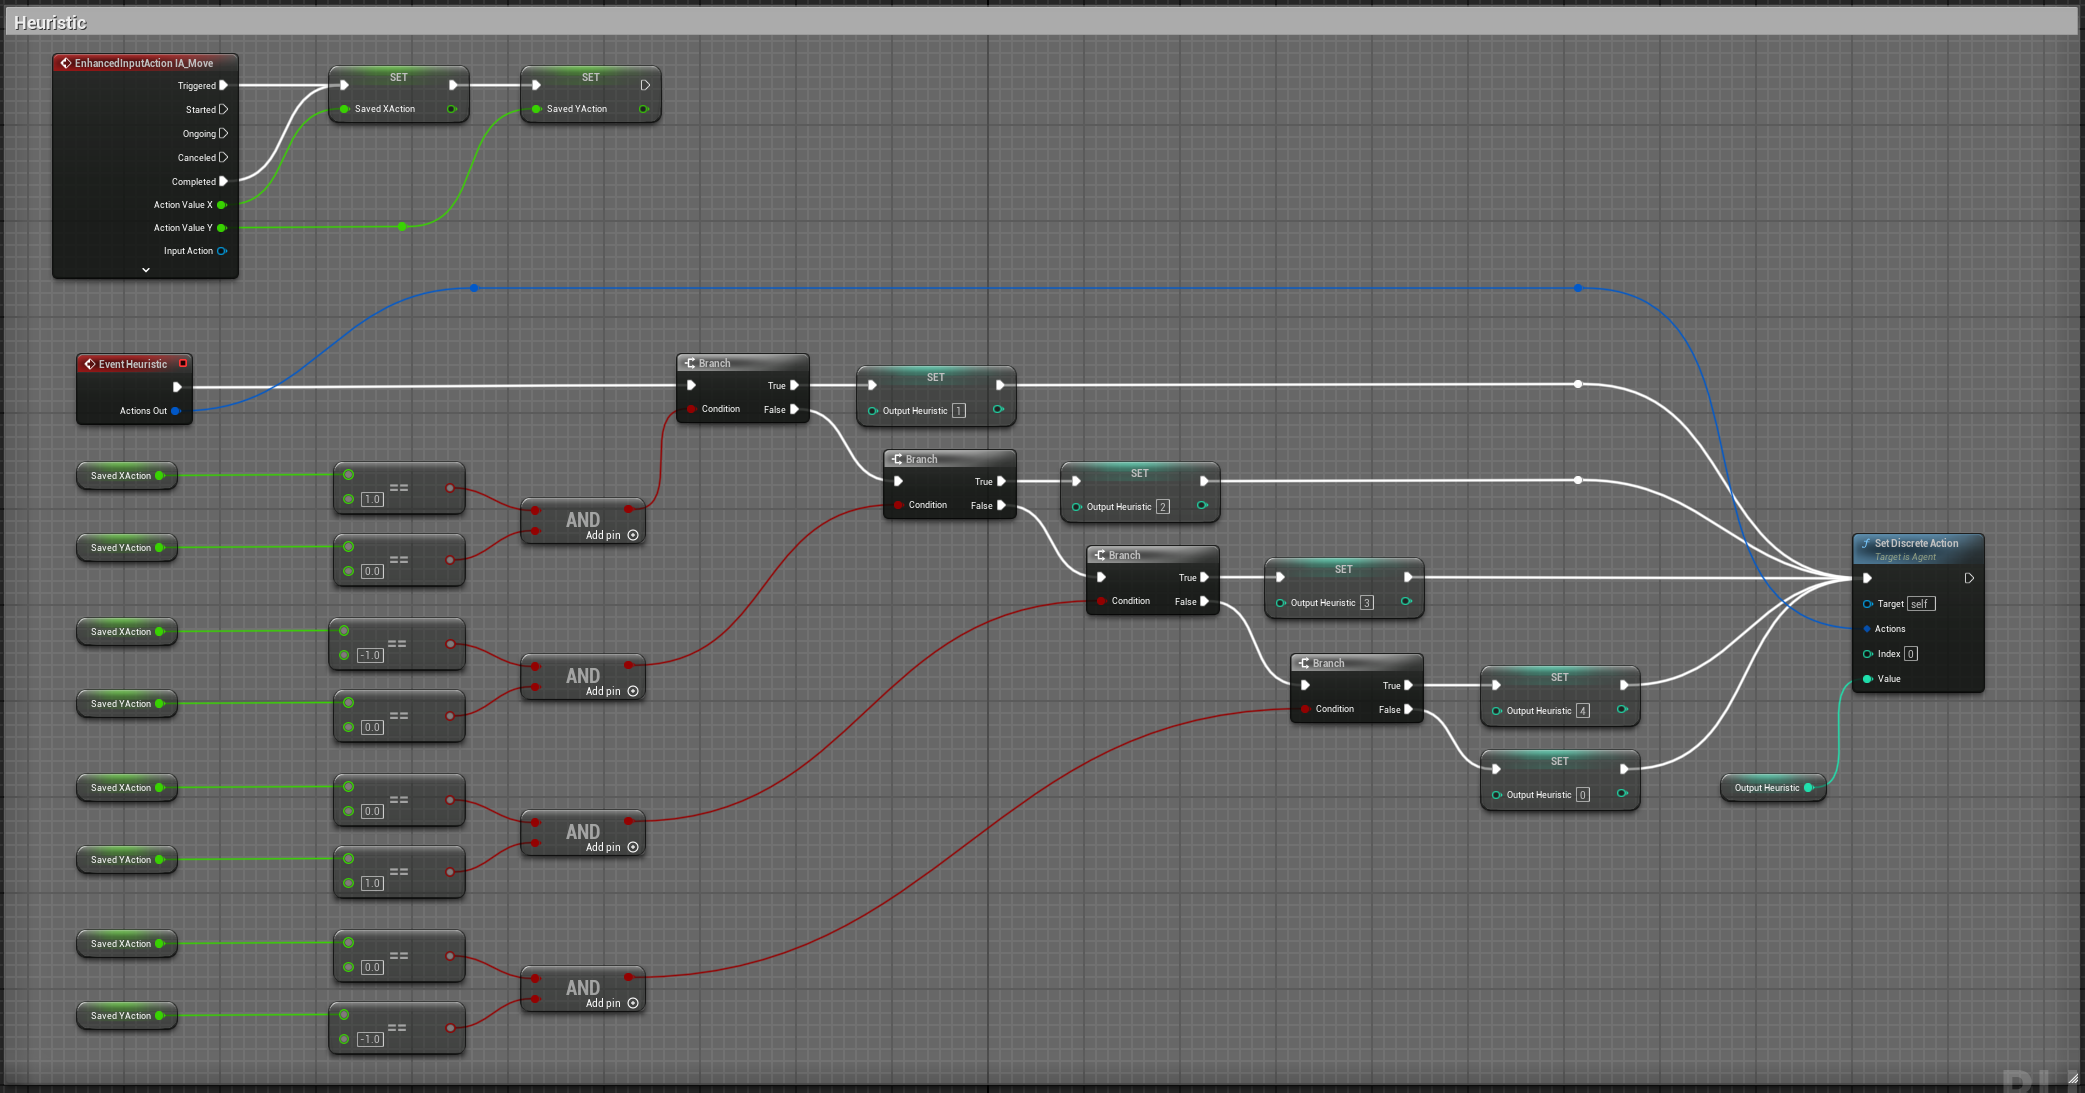
While we could have susbcribed to the input axis in C++, we will do it in Blueprint. For that you need to set two variables in the RollerAgent class to pass the value of the axis to the heuristic method.
public:

   void Heuristic_Implementation(const FActionBuffers& ActionsOut) override;

   UPROPERTY(BlueprintReadWrite, Category = "AgentInput")
   float ControllerInputX;

   UPROPERTY(BlueprintReadWrite, Category = "AgentInput")
   float ControllerInputY;
void URollerAgent::Heuristic_Implementation(const FActionBuffers& ActionsOut) {
   FActionSegment<int32> DiscreteActionsOut = ActionsOut.DiscreteActions;
   DiscreteActionsOut[0] = ControllerInputX > 0 ? 1 : (ControllerInputX < 0 ? 2 : (ControllerInputY > 0 ? 3 : (ControllerInputY < 0 ? 4 : 0)));
}
We now need to pass the DirectionX and DirectionY values to the ControllerInputX and ControllerInputY variables. To do that, in the BP_RollerBall Blueprint, add the following nodes:
In order for the Agent to use the heuristic, you will need to set the Behavior Type to “Heuristic Only” in the Behavior Parameters of the BP_RollerAgent in the Outliner.
Warning
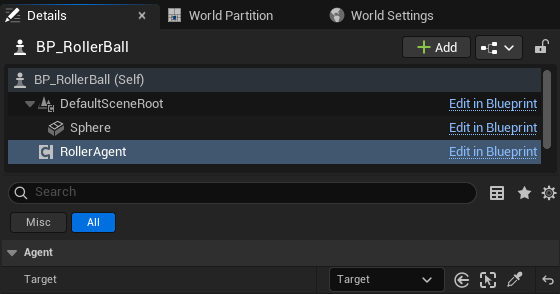
Do not forget to add the Cube Target reference to the agent in the level. See below picture as a reference
Press Play to run the scene and use the arrow keys to move the Agent around the platform. Make sure that there are no errors displayed in the Unreal Editor’s Output Log and that the Agent resets correctly when it reaches its target or falls off the platform.
Training the Environment
The process is the same as described in the Getting Started Guide.
Create a configuration file (e.g., roller_sphere_config.yaml) in your project’s config folder.
Include training parameters such as:
behaviors:
  RollerBall:
    trainer_type: ppo
    hyperparameters:
      batch_size: 10
      buffer_size: 100
      learning_rate: 3.0e-4
      beta: 5.0e-4
      epsilon: 0.2
      lambd: 0.99
      num_epoch: 3
      learning_rate_schedule: linear
      beta_schedule: constant
      epsilon_schedule: linear
    network_settings:
      normalize: true
      hidden_units: 128
      num_layers: 2
    reward_signals:
      extrinsic:
        gamma: 0.99
        strength: 1.0
    max_steps: 500000
    time_horizon: 64
    summary_freq: 10000
Hyperparameters are explained in the training configuration file documentation: Unity ML-Agents Training Configuration File.
Since this example creates a very simple training environment with only a few inputs and outputs, using small batch and buffer sizes speeds up the training considerably. However, if you add more complexity to the environment or change the reward or observation functions, you might also find that training performs better with different hyperparameter values. In addition to setting these hyperparameter values, the Agent DecisionFrequency parameter has a large effect on training time and success. A larger value reduces the number of decisions the training algorithm has to consider and, in this simple environment, speeds up training.
To train your agent, run the following command before pressing Play in the Editor:
ue-agents-learn path/to/config/rollerball_config.yaml --run-id=RollerBall
To monitor the statistics of Agent performance during training, use TensorBoard: Using TensorBoard.

In particular, the cumulative_reward and value_estimate statistics show how well the Agent is achieving the task. In this example, the maximum reward an Agent can earn is 1.0, so these statistics approach that value when the Agent has successfully solved the problem.
Optional: Multiple Training Areas within the Same Scene
In many of the example environments, multiple copies of the training area are instantiated in the scene. This generally speeds up training, allowing the environment to gather many experiences in parallel. This can be achieved simply by instantiating many Agents with the same Behavior Name.
In Unreal, you can duplicate the RollerBall folder you created at the beginning of this document and make as many copies as you want. Since all positioning logic is related to the starting position of the ball, duplicating the folder ensures every environment is equal and every observation is consistent for the neural network. This setup allows the neural network to train effectively across identical training areas, providing more robust learning data for the Agent.